The Top 5 Standard Painting Surface Preparation Procedures
When it comes to painting there are standard procedures for surface preparation that should be performed prior to applying the coating. Depending on the meticulousness or lack of, painters tend to have varying degrees of what they think is proper surface preparation. This is why I have selected the top 5 procedures that I believe should be performed to achieve standard results.
Before we get into talking about painting surface preparation let’s discuss the players in the game, namely the painter and the customer. Each in not without fault when it comes to the confusion surrounding the amount of work necessary for preparing walls before painting.
The Players
You would think every painter would enlighten their potential client on the amount of preparation that will ensue, but inhere we find that it is in the benefit of the painter to elude this topic altogether. The reason being that if the painter doesn’t explicitly explain what wall preparation will be performed then they’re technically not on the hook for it. Now painters don’t do this maliciously, they do it because they think that by skipping wall preparation they can give you a lower bid for the job and thereby increase the chance they will get hired. Hence the reason for the low-end painting market. It is only malicious when the painter tells you they will do the prep work and charges for it but skips it to turn a higher profit.
Another reason the painter is afraid of being on the hook for wall preparation is because customer expectations haven’t been addressed. As a painting contractor I’ve had my share of demanding clients with unrealistic expectations, so I completely understand their fears. There are customers who believe that painting should include tremendous efforts to bring their poor quality surfaces to a brand new condition. They never see the efforts taken by the painter to improve the surface, they only see the remaining defects. Surface preparation is an iterative process that requires many passes. After each pass you, a new set of eyes can always discover some defects or imperfections that were missed. That’s why it’s important to set expectations and bill for the passes you do. In mathematical terms, if someone want’s perfect surfaces their budget should approach an infinite limit.
The reasons above are why it is crucial to define standards for surface preparation, that way there is a fair tradeoff for both parties.
Cleaning Comes First And Last
Before doing anything it is important to clean the surfaces that will be painted. There is usually dust sitting in corners, on top of trim, and on walls where something has been moved away from that should be vacuumed. Walls and trim should be washed down with a damp rag to remove contaminants such as coffees spills, oil residue, and other contaminants. Anything that can be removed like marker and crayon marks should be removed now to prevent bleed through when painting. Sometimes you may need to you degreasers or solvents to remove the contaminant. This step should be repeated when new dust is created in further steps. It is important to clean before sanding so as to not work the contaminants into the surfaces making them harder to remove later.
Light Scuff Sanding And Scraping
Anything peeling, and loose should be scraped off prior to painting. This is also a good time to check for sag and runs left by the previous painter and scrape them. Afterwards all surfaces should receive a sanding with a medium grit abrasive. For walls and ceilings I recommend 150 grit, and for woodwork it’s recommended to use a 220 grit.
The visual reason for lightly scuff sanding the surface is to improve the way it looks by removing defects like lint and dust specks infused into the previous paint job. Lap lines and heavy texture left by the previous painter typically requires more attention and should be addressed separately with the customer. It is not standard procedure to remedy these defects. Sometimes heavy sanding or skim coating may be required to fix these. The same goes for woodwork, if it was finished poorly by the previous painter then extra efforts must be taken to restore them back to acceptable quality.
Another benefit of sanding is that the mechanical abrading of a surface provides a scratch profile in the substrate that allows the new paint to bond better and stronger with the wall. When this profile is created it is usually not required to prime when going over an existing paint job that is the same base, either oil or latex.
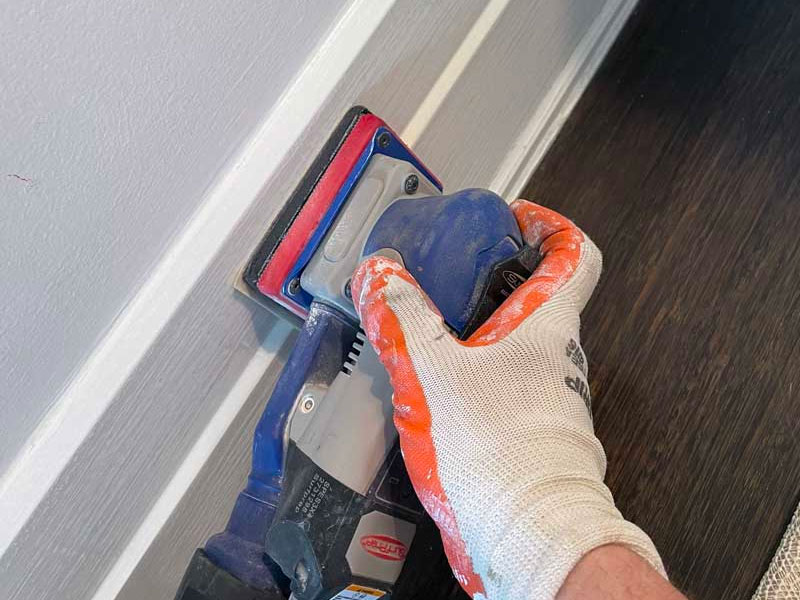
Sanding is undoubtably everyone’s least favorite task before painting. However certain things can be done to make it more tolerable. Technological advances have created new equipment that make sanding a breeze. It’s highly recommended that you use a painter that utilizes these technologies. The benefits are better sanding results due to more sanding taking place thanks to higher rpm of the machines when compared to manual sanding, and near dustless sanding thanks to vacuum shroud attachments to equipment.
Filling Nail Holes, Dents, Small Cracks, And Scraped Peeling Paint
At this point of the preparation process the painter should inspect the walls for nail holes, dents, small cracks, and areas where peeling paint was scraped off earlier. These cavities in the wall should be filled with a spackling putty flush with the surface. Sometimes depending on the quality of putty used a second or third pass is required to make sure the surface will be flush when sanded, this is standard procedure. Small cracks should be opened up in a v-channel fashion and also spackled with his putty. If the customer would like a more sturdier repair for cracks it is considered above standard prep and should be charged accordingly. The painter is only responsible for the cosmetic appearance of the repair. An example of a better repair would include applying a bonding primer inside the v-channel filling with a hot mud mix, applying a fiber mesh tape on the crack and floating it with three coats of joint compound with the rest of the surface to smooth it out. As you can imagine this repair takes more time and should therefore be up charged accordingly. All putty should be sanded flush, and vacuumed after this step.
Sometimes the customer has cracks on the entire wall, this typically happens on old plaster walls. In this scenario it is advised that the painter give a quote for skim coat plastering. This sort of work is labor intensive and should be performed to achieve optimal results on the finish product if the client desires a quality paint job.
Removing Old Failed Caulking And Re-caulking Trim
All building materials expand and contract throughout the seasons, because of this cracking inevitably occurs. This is usually most evident at the lines where your wood trim meets the wall or ceiling. The caulking underneath the paint has failed and cracked requiring it to be removed and replaced. It’s crucial that the painter remove the failed section and not just caulk on top of it. Doing so incorrectly with lead to premature failure soon. It’s advised that a siliconized latex caulk be used to support more movement and provide better caulk resistance. These type of caulks typically dry longer, shrink, and as a result require double or triple application before being coated.
Caulk should also be applied in areas that the previous painter missed, however caulk should not be applied between the floor and baseboard trim. Wood floors move too much and will force the caulk to crack in one change of the seasons. It’s better to make sure your floors are level and that your carpenter installed the baseboard level leaving a minimal gap.
Spot Priming Bare, Filled, And Caulked Areas
The final step in this process before painting is to spot prime all areas that were worked on in the previous steps. It’s not required to prime the entire surface, however doing so will give a better finish and provide even better adhesion and is strongly recommended. Priming all the surfaces is not standard procedure for a repaint and should be done at an additional cost.
So what should be spot primed? All the areas that you filled in with spackling, just make sure they were sanded and vacuumed before priming. All sections that you caulked should also be primed so that the paint will not crack on top of the caulking. Make sure the caulking has dried sufficiently before priming. If you prime too quickly, little cracks will form due to the shrinking underneath. I typically wait a day before priming caulk, however sometimes when you need to do it same day it’s advised to use a fast drying caulk that can be painted over in 30 minutes or so.
Other areas that will require priming are spots that haven’t been primed before, namely bare areas. These are usually areas where a new piece of drywall has been installed and finished but not painted.
And Now We’re Finally Paint Ready
If your painter has followed these procedures then you can rest assured that you hired a professional who will complete the job to a quality standard. If you’re thinking about getting your interior painted with the surface preparation described above then head over to our Interior Painting service webpage and leave your contact information. You can also get a ballpark estimate instantly using our easy to use calculator. See our painting services below.